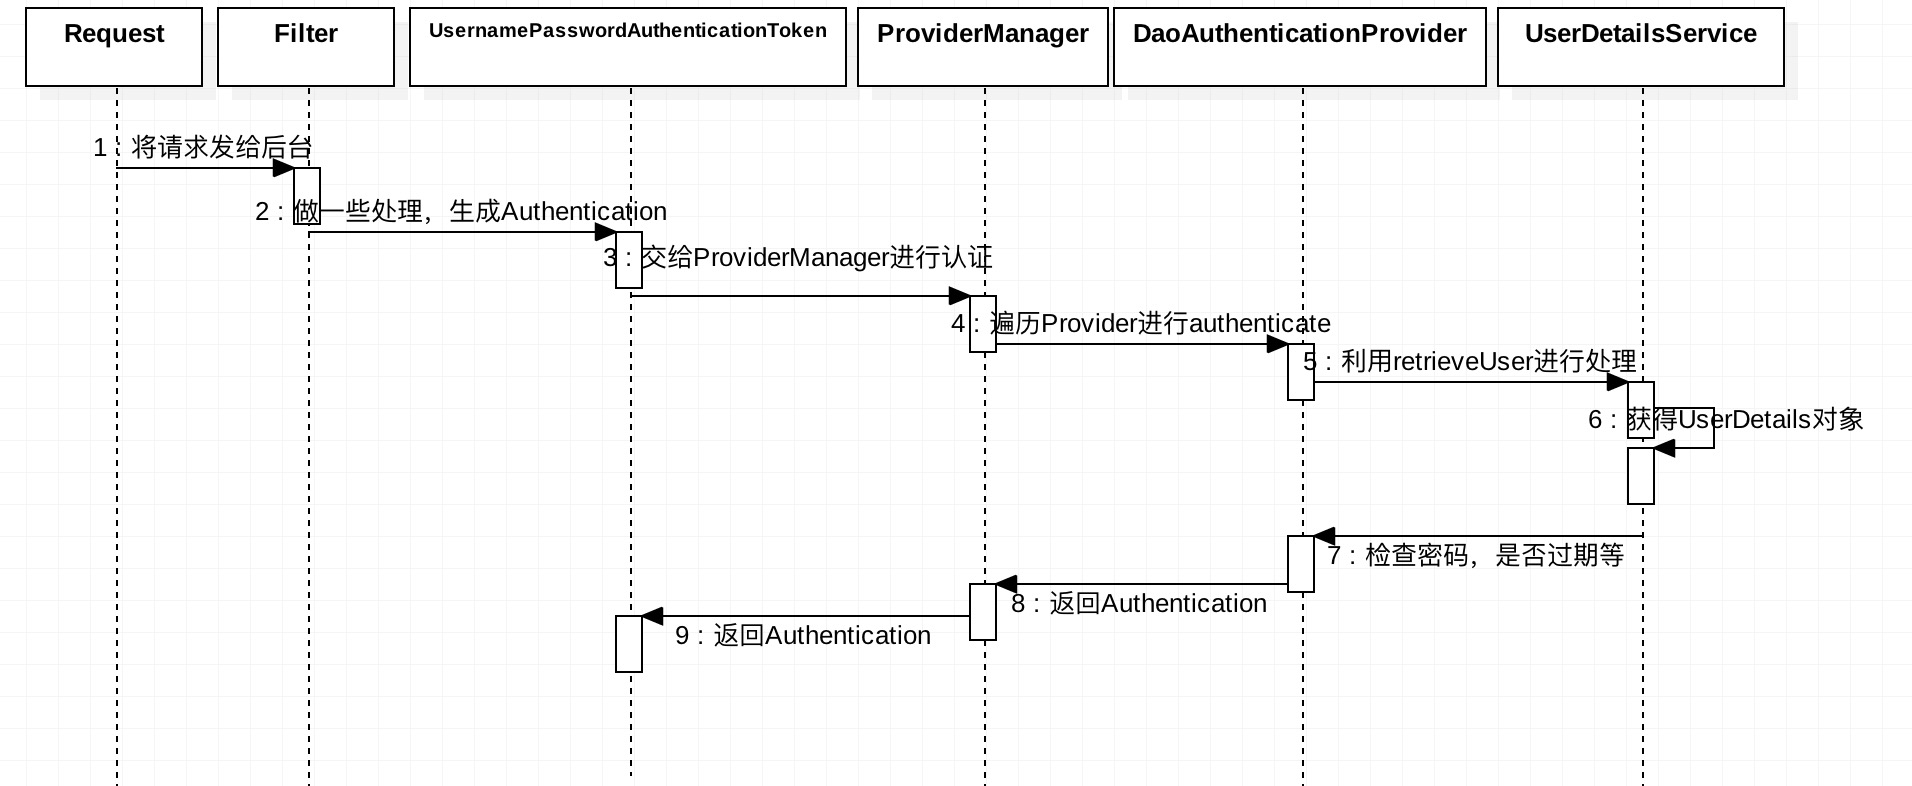
引:有了Spring作为基础,Spring家族的很多框架都显得那么棒,尤其是Springboot的出现,简化了配置,家族框架就显得更棒了,我们这次分析一下其中的SpringSecurity,我们会由请求认证过程,来分析其中的各个组件!
一次认证过程

大家可以找到一个工程,这里也可以看看我的SpringBoot+Angular工程debug验证我画的流程图。
核心组件
Filter
在最开始debug的过程中我们会发现pring Security使用了springSecurityFillterChian作为了安全过滤的入口,我只介绍几个比较常用的过滤器。
SecurityContextPersistenceFilter
两个主要职责:
- 请求来临时,创建SecurityContext安全上下文信息
- 请求结束时清空SecurityContextHolder(可获得当前操作的用户是谁,该用户是否已经被认证,他拥有哪些角色权限等信息)。
我们看看它的源码:1
2
3
4
5
6
7
8
9
10
11
12
13
14
15
16
17
18
19
20
21
22
23
24
25
26
27
28
29
30
31
32
33
34
35
36
37
38
39
40
41
42
43
44
45
46
47
48
49
50public class SecurityContextPersistenceFilter extends GenericFilterBean {
static final String FILTER_APPLIED = "__spring_security_scpf_applied";
// 安全上下文存储的仓库
private SecurityContextRepository repo;
public SecurityContextPersistenceFilter() {
// HttpSessionSecurityContextRepository是SecurityContextRepository接口的一个实现类
// 使用HttpSession来存储SecurityContext
this(new HttpSessionSecurityContextRepository());
}
public void doFilter(ServletRequest req, ServletResponse res, FilterChain chain) throws IOException, ServletException {
HttpServletRequest request = (HttpServletRequest)req;
HttpServletResponse response = (HttpServletResponse)res;
if(request.getAttribute("__spring_security_scpf_applied") != null) {
chain.doFilter(request, response);
} else {
boolean debug = this.logger.isDebugEnabled();
request.setAttribute("__spring_security_scpf_applied", Boolean.TRUE);
if(this.forceEagerSessionCreation) {
HttpSession session = request.getSession();
if(debug && session.isNew()) {
this.logger.debug("Eagerly created session: " + session.getId());
}
}
// 包装request,response
HttpRequestResponseHolder holder = new HttpRequestResponseHolder(request, response);
// 从Session中获取安全上下文信息
SecurityContext contextBeforeChainExecution = this.repo.loadContext(holder);
boolean var13 = false;
try {
var13 = true;
// 请求开始时,设置安全上下文信息,这样就避免了用户直接从Session中获取安全上下文信息
SecurityContextHolder.setContext(contextBeforeChainExecution);
chain.doFilter(holder.getRequest(), holder.getResponse());
var13 = false;
} finally {
if(var13) {
SecurityContext contextAfterChainExecution = SecurityContextHolder.getContext();\
//请求结束后,清空安全上下文信息
SecurityContextHolder.clearContext();
this.repo.saveContext(contextAfterChainExecution, holder.getRequest(), holder.getResponse());
request.removeAttribute("__spring_security_scpf_applied");
}
}
...
}
}
}
UsernamePasswordAuthenticationFilter
这个可能是我们遇见最多的过滤器了,一个最直观的业务场景便是允许用户在表单中输入用户名和密码进行登录,而这背后用到的就是UsernamePasswordAuthenticationFilter。这个过滤器也可以见证我们之前画的时序图,我们看看它的源码:1
2
3
4
5
6
7
8
9
10
11
12
13
14
15
16
17
18
19
20
21public Authentication attemptAuthentication(HttpServletRequest request, HttpServletResponse response) throws AuthenticationException {
if(this.postOnly && !request.getMethod().equals("POST")) {
throw new AuthenticationServiceException("Authentication method not supported: " + request.getMethod());
} else {
// 获取用户名,密码
String username = this.obtainUsername(request);
String password = this.obtainPassword(request);
if(username == null) {
username = "";
}
if(password == null) {
password = "";
}
username = username.trim();
// 生成Authentication,下面会介绍
UsernamePasswordAuthenticationToken authRequest = new UsernamePasswordAuthenticationToken(username, password);
this.setDetails(request, authRequest);
// 讲Authentication交给AuthenticationManager认证
return this.getAuthenticationManager().authenticate(authRequest);
}
}
自定义Filter
当自带的Filter不能满足你的要求时(例如我们要先对token进行认证),我们可以自定义过滤器,只要继承各种Filter接口,并实现其中方法即可。
Authentication
先看他的源码:1
2
3
4
5
6
7
8
9
10
11
12
13public interface Authentication extends Principal, Serializable {
// 权限信息列表
Collection<? extends GrantedAuthority> getAuthorities();
// 密码信息,用户输入的密码字符串,在认证过后通常会被移除,用于保障安全
Object getCredentials();
// 细节信息,它记录了访问者的ip地址和sessionId的值。
Object getDetails();
// 最重要的身份信息,大部分情况下返回的是UserDetails接口的实现类
Object getPrincipal();
// 是否已认证
boolean isAuthenticated();
void setAuthenticated(boolean var1) throws IllegalArgumentException;
}
从它的源码可以知道它拥有的权限信息列表,密码,用户细节信息,用户身份信息,认证信息。
它有很多实现类,比如流程图中的UsernamePasswordAuthenticationToken,以及AnonymousAuthenticationToken等。
AuthenticationManager
先看看它的源码:1
2
3
4public interface AuthenticationManager {
// 主要是认证传进来的Authentication
Authentication authenticate(Authentication var1) throws AuthenticationException;
}
它最有用的实现类就是流程图中的ProviderManager,我们可以看看它的源码:1
2
3
4
5
6
7
8
9
10
11
12
13
14
15
16
17
18
19
20
21
22
23
24
25
26
27
28
29
30
31
32
33
34
35
36
37
38
39
40
41
42
43
44
45
46
47
48
49
50
51
52
53public class ProviderManager implements AuthenticationManager, MessageSourceAware, InitializingBean {
// 维护一个AuthenticationProvider列表
private List<AuthenticationProvider> providers;
private boolean eraseCredentialsAfterAuthentication;
public Authentication authenticate(Authentication authentication) throws AuthenticationException {
Class<? extends Authentication> toTest = authentication.getClass();
AuthenticationException lastException = null;
// 要从新返回的Authentication
Authentication result = null;
// 遍历AuthenticationProvider列表
Iterator var6 = this.getProviders().iterator();
while(var6.hasNext()) {
AuthenticationProvider provider = (AuthenticationProvider)var6.next();
if(provider.supports(toTest)) {
try {
// 对传进来的authentication进行认证
result = provider.authenticate(authentication);
if(result != null) {
// 将属性复制给result
this.copyDetails(authentication, result);
break;
}
} catch (AccountStatusException var11) {
...
}
}
}
if(result == null && this.parent != null) {
try {
// 如果列表里的Provider都不支持该authentication,则到父类查找
result = this.parent.authenticate(authentication);
} catch (ProviderNotFoundException var9) {
;
} catch (AuthenticationException var10) {
lastException = var10;
}
}
if(result != null) {
if(this.eraseCredentialsAfterAuthentication && result instanceof CredentialsContainer) {
// 擦除密码信息
((CredentialsContainer)result).eraseCredentials();
}
this.eventPublisher.publishAuthenticationSuccess(result);
return result;
} else {
...
}
}
AuthenticationProvider
看看它的源码先:1
2
3
4
5
6public interface AuthenticationProvider {
// 认证
Authentication authenticate(Authentication var1) throws AuthenticationException;
// 判断是否支持传进来的Authentication
boolean supports(Class<?> var1);
}
我们接着看看它最常用的一个实现DaoAuthenticationProvider。也看看它的源码:1
2
3
4
5
6
7
8
9
10
11
12
13
14
15
16
17
18
19
20
21
22
23
24
25
26
27
28
29
30
31
32
33
34
35public class DaoAuthenticationProvider extends AbstractUserDetailsAuthenticationProvider {
// 密码加密器
private PasswordEncoder passwordEncoder;
// 加载用户的UserDetailsService
private UserDetailsService userDetailsService;
protected void additionalAuthenticationChecks(UserDetails userDetails, UsernamePasswordAuthenticationToken authentication) throws AuthenticationException {
if(authentication.getCredentials() == null) {
...
} else {
// 验证密码
String presentedPassword = authentication.getCredentials().toString();
if(!this.passwordEncoder.matches(presentedPassword, userDetails.getPassword())) {
...
}
}
}
// 最核心的方法
protected final UserDetails retrieveUser(String username, UsernamePasswordAuthenticationToken authentication) throws AuthenticationException {
this.prepareTimingAttackProtection();
try {
// 获得UserDetails
UserDetails loadedUser = this.getUserDetailsService().loadUserByUsername(username);
if(loadedUser == null) {
...
} else {
return loadedUser;
}
} catch (UsernameNotFoundException var4) {
...
}
}
}
UserDetailsService
先看看它的源码:1
2
3public interface UserDetailsService {
UserDetails loadUserByUsername(String var1) throws UsernameNotFoundException;
}
这个接口的实现类有JdbcDaoImpl(负责从数据库加载用户)等,当然我们也可以自己实现这个接口。只要实现loadUserByUsername方法即可。
再看看UserDetails是个什么东西?
看看它源码:1
2
3
4
5
6
7
8
9
10
11
12
13
14
15
16public interface UserDetails extends Serializable {
// 权限属性
Collection<? extends GrantedAuthority> getAuthorities();
// 密码属性
String getPassword();
// 用户名属性
String getUsername();
// 账户是否过期
boolean isAccountNonExpired();
// 账户是否被锁
boolean isAccountNonLocked();
// 密码是否过期
boolean isCredentialsNonExpired();
// 是否启用
boolean isEnabled();
}
它代表了最详细的用户信息,这个接口涵盖了一些必要的用户信息字段,具体的实现类对它进行了扩展。这里我们普通的User类也可以实现这个接口。
核心配置
通过我们上面对核心组件的解读再结合流程流就应该可以理解SpringSecurity的请求认证过程。但是不可能我们对所有的路径都需要认证,或者说它总要提供一个东西让我们配置它的细节,那就是WebSecurityConfigurerAdapter接口,它主要使用了适配器模式。我们主要看看我们需要覆盖它的方法:1
2
3
4
5
6
7
8
9
10
11
12
13public abstract class WebSecurityConfigurerAdapter implements WebSecurityConfigurer<WebSecurity> {
// 配置AuthenticationManagerBuilder
protected void configure(AuthenticationManagerBuilder auth) throws Exception {
this.disableLocalConfigureAuthenticationBldr = true;
}
// 配置WebSecurity
public void configure(WebSecurity web) throws Exception {
}
// 配置HttpSecurity
protected void configure(HttpSecurity http) throws Exception {
((HttpSecurity)((HttpSecurity)((AuthorizedUrl)http.authorizeRequests().anyRequest()).authenticated().and()).formLogin().and()).httpBasic();
}
}
配置AuthenticationManagerBuilder
我们可以看看它的使用案例:1
2
3
4
5
6
7
8
9public class WebSecurityConfig extends WebSecurityConfigurerAdapter {
protected void configure(AuthenticationManagerBuilder auth) throws Exception {
auth
.inMemoryAuthentication()
.withUser("admin").password("admin").roles("USER");
}
}
想要在WebSecurityConfigurerAdapter中进行认证相关的配置,可以使用configure(AuthenticationManagerBuilder auth)暴露一个AuthenticationManager的建造器:AuthenticationManagerBuilder 。如上所示,我们便完成了内存中用户的配置,也可以在这里讲自己定义的UserDetailService注入。
配置WebSecurity
我们可以看看它的使用案例:1
2
3
4
5
6
7
8
9
10
11
12
13
14
15
16
17
18
19
20
21
22
23
24
25
26
27
28
29
30
31public class WebSecurityConfig extends WebSecurityConfigurerAdapter {
protected void configure(HttpSecurity http) throws Exception {
http
// 配置路径拦截,表明路径访问所对应的权限,角色,认证信息。
.authorizeRequests()
.antMatchers("/resources/**", "/signup", "/about").permitAll()
.antMatchers("/admin/**").hasRole("ADMIN")
.antMatchers("/db/**").access("hasRole('ADMIN') and hasRole('DBA')")
.anyRequest().authenticated()
.and()
// 配置表单认证
.formLogin()
.usernameParameter("username")
.passwordParameter("password")
.failureForwardUrl("/login?error")
.loginPage("/login")
.permitAll()
.and()
// 配置注销
.logout()
.logoutUrl("/logout")
.logoutSuccessUrl("/index")
.permitAll()
.and()
// 配置basic登录
.httpBasic()
.disable();
}
}
方法里的各项配置分别代表了http请求相关的安全配置,这些配置项无一例外的返回了Configurer类,而所有的http相关配置可以通过查看HttpSecurity的主要方法得知。
WebSecurityBuilder
我们可以看看它的使用案例:1
2
3
4
5
6
7
8public class WebSecurityConfig extends WebSecurityConfigurerAdapter {
public void configure(WebSecurity web) throws Exception {
web
.ignoring()
.antMatchers("/resources/**");
}
}
这个配置中并不会出现太多的配置信息。
架构

将这个架构图结合流程图我们会可以大致总结出核心组件之间的关系,有利于我们我们更好的理解SpringSecurity的架构以及请求认证过程。